
Remove Old Office Licenses

Sometimes it can happen that after installing your new Office it still indicates that an older Office is geïnstalleerd. For example, Office 2024 installed but in your File – account it still shows Office 2021 or Office 2019.
This means that there are still small remnants of your previous Office application. You can solve this simply:
Solution 1 :
Use the Office removal tool to ensure all old remnants of Office are removed: https://aka.ms/SaRA-officeUninstallFromPC
If you have already done this before installing Office, you may proceed to solution 2.
Solution 2:
Open Word. Click on file – Account and you are logged in at the top left. Click here to sign out. Close Word and restart Word again. Go again to file – account and on the right side of the screen choose to change product code (if you are asked for an account to log in, do not do this but click on the link below “I have a product code” and enter the license code you received from us).
Solution 3 :
Close all your Office applications.
Go with Explorer to “c:\program data\Microsoft\office\licences” and delete all files that are in this directory
(the folder \\program data may be hidden for you. Click on “view” at the top of your explorer and then “show hidden items”)
Start Word again : you will be prompted to log in or you can choose to enter a product key. Do not log in but then re-enter the key and your identification should normally be correct as Office 2024.
Solution 4 :
Please note that these steps are not for beginners and require some technical knowledge / insight. Everything is done entirely at your own risk and we cannot provide any support.
That said, let's get started right away.
Step 1: open command prompt and run control script
- Open command prompt as administrator (start type in cm and then right-click run as administrator).
- If the cmd is open you can run the script below to see which product keys are installed on your system
For 64‑bit Office: cscript “%ProgramFiles%\\Microsoft Office\\Office16\\ospp.vbs” /dstatus
For 32 bits Office: cscript “%ProgramFiles(x86)%\\Microsoft Office\\Office16\\ospp.vbs” /dstatus
A small note: you see Office16 in this example. That stands for Office 2016/2019. If you have an older version, choose Office 2013 (Office15) and for Office 2010 (Office14)
You will then see a screen like this:
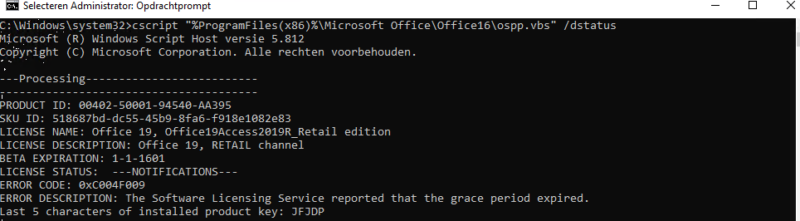
Important is that there may be multiple codes geïnstalleerd (for the same product). Note only the last 5 characters that you WANT to remove.
Step 2: Actually removing the product code
Do you have the last 5 characters? Then we can now actually delete the code
We do this with the script below:
cscript “%ProgramFiles%\\Microsoft Office\\Office16\\ospp.vbs” /unpkey:xxxxx
Or if you get an error message:
cscript “%ProgramFiles(x86)%\Microsoft Office\Office16\ospp.vbs” /unpkey:xxxxx
Obviously, the xxxxx are the last 5 characters of the product code you want to remove.
As in our case: cscript “%ProgramFiles(x86)%\\Microsoft Office\\Office16\\ospp.vbs” /unpkey:jfjdp
Step 3: It's still Microsoft, so always reboot for safety
Yes, this title basically says it all: always reboot. I got this as a tip when a Microsoft employee, after hours of searching, still hadn't managed to strip the system of a product code.
And that's basically it.
In short:
- Open cmd (command prompt) as administrator
- Run the script to see which codes are on your system.
- Verify the last 5 characters match the code you want to delete
- Run the script to delete the code and you're done.